The Story Map Tour app is ideal when you want to present a linear, place-based narrative featuring images or videos. Each "story point" in the narrative is geo-located. Users have the option of clicking sequentially through the narrative, or they can browse by interacting with the map or using the thumbnail carousel.
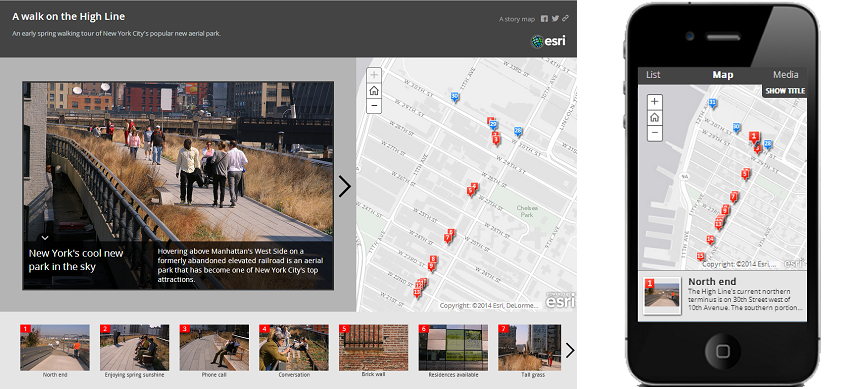
View it live | Map Tour page on Esri Story Maps website | Download
Latest release is version 2.17.0, if you want to be informed of new releases, we recommend you to watch these repository (see GitHub help). See the release page for release notes.
For more infomation about using and customizing Esri's Storytelling Apps follow the Story Maps Developers' Corner.
The template produces an attractive, easy-to-use web application that lets you present a small set of places on a map in a numbered sequence through which users can browse. The template is designed to be used in any web browser on any device, including smartphones and tablets. If you are not familiar with ArcGIS Online or StoryMaps concepts, that document describe general workflows and best practices.
This help will guide you through the steps for publishing Map Tours like:
Help content:
- Introduction
- How to deploy a Map Tour
- Data storage options
- FAQ
- Tips
- Customize the look and feel
- Developer guide
- Feedback
- Issues
- Contributing
- Licensing
The template is available in two versions:
- An hosted version in ArcGIS Online that provide hosting and an interactive builder tool to all ArcGIS Online account levels including the free Public account
- A downloadable version that you can deploy on your web server and enhance to fit your needs
You don't have to download the template to use it! You can create and deploy a Map Tour using the hosted version of this template that is built into ArcGIS.com. This is available to all ArcGIS Online account levels including the free Public account. We host the template for you so you don't have to download the template and put it on your server or website. There's an interactive builder too that makes it easy to author your Map Tour. Using the hosted template is the easiest and fastest way to create a Map Tour.
The main element to consider when building a Map Tour is to choose where your pictures will be stored. A Map Tour can use pictures stored on major photo sharing services, on any web server or in Feature Services. Applications produced by both versions provides the same capabilities, only the authoring is different.
To use the hosted Map Tour template, you start by making a web map and publishing it with the Map Tour template. Your webmap doesn't need to contains any layer. In the Share dialog available from ArcGIS Online web map viewer, choose the 'Make a Web Application' option and then choose the Map Tour template from the gallery of templates that appears, and continue with the steps that you see. When you configure the application, the interactive builder will open automatically. This article provides step-by-step instructions on how to create a story.
The interactive builder gives you two options for handling the images in your Map Tour:
- You can use photos that are already online, such as images stored in a photo sharing site like Flickr or images stored on your own website. These images will be referenced in your Map Tour via their URLs
- You can also upload photos from your computer directly into your Map Tour. This upload option requires that you have an ArcGIS for Organizations subscription account and you have Publisher or Administrator privileges (because it automatically creates a hosted feature service for you in which your photos are stored as attachments)
Using the hosed version will allow you to benefits from ArcGIS Online periodic updates that improve performance and fix issues without introducting breaking changes.
How to upgrade from a self hosted version to the hosted template
If you've previously used the map tour template and hosted it from your own servers, you can update to the ArcGIS Online hosted tour by opening your existing web map, choosing Share, then Make a Web Application, and choosing Publish with the new Map Tour template.
Note that if your actual tour point layer doesn’t contains the optional attribute that define the point marker color, the interactive builder will require you to choose the attribute that define the color. So we recommend that you drop the layer from the webmap and import your original CSV using the assistant that will create the color field for you. Otherwise you can also select any attribute like the description field even if it doesn’t contains any valid color value but be aware that if you change the color using the interactive builder that value will be persisted and you will lose the point description.
Although the hosted Map Tour template provides several customization options that are accessible through the Settings button in map tour builder app, you may want to perform additional customizations or add your own code to the application. In this case, you should use the downloadable version.
By downloading the template and putting it on your own web server or website, you can make unlimited customizations and changes to the template. With the download, the URL of your map tour will be start with your own web domain instead of being on the ArcGIS cloud system.
The downloadable version can be configured through a web map or a web mapping application identifier. The main use cases are:
- You build your map tour using the interactive builder in the hosted environment and configure the template with the web mapping application identifier. All your configuration will be there
- You build your web map outside of the interactive builder and configure the template with the web map identifier. You will have to read the documentation to learn how to configure the template
Note that the interactive builder is available in the downloadable version but with some technical restrictions on browsers like Internet Explorer before version 10.
To use the downloadable version, download the User Download archive, it contains the following files:
| File | Contains |
|---|---|
| app/ | Optimized source code and configuration files (maptour-config.js) |
| resources/ | Resources (markers, icons, translation) |
| samples/ | Sample data layer to create your webmap |
| index.html | Application html file (to be edited with web map id) |
| license.txt | Application license |
Map Tour rely on a web map (or a web mapping application) identifier to get the data.
There is multiple ways to build a web map for Map Tour:
- Create a blank webmap using ArcGIS Online, publish a Map Tour and use the interactive builder to create your data source. This will allow you to import photos from Flickr, Facebook, Picasa, create a Feature Service hosted in ArcGIS Online or load data from a CSV
- Use an existing Feature Service, see the chapter below
- Build a CSV and add it as a web map layer using ArcGIS Online web map viewer. That is not the recommended way to proceed anymore. This ArcWatch article provides step-by-step instructions
For quick start, there is two typical ways of configuring a Map Tour:
- You build your map tour using the interactive builder in the hosted environment and configure the template with the web mapping application identifier. All the settings you have defined with the interactive builder will be applied and you will have minimal configuration to perform.
- You build your web map outside of the interactive builder and configure the template with the web map identifier. You will have to read the documentation to learn how to configure the template.
To build a Map Tour using the interactive viewer:
- Open ArcGIS Online web map viewer
- Create a web map that fits your need (basemap, eventual additional context layers like the path of your tour, etc.)
- Save the web map
- In the Share dialog, choose the 'Make a Web Application' option and then choose the Map Tour template from the gallery of templates that appears, and continue with the steps that you see.
- Open the application item and the interactive builder will open automatically.
- Follow the steps to build your Map Tour
- Visit the settings to customize the look and feel
- Save and share the web application publicly
- Open index.html with a text file editor
- Locate the configuration section at the beginning of the file
- Edit the line appid:"" to include your application id between the quotes (the application id is the string emphasized in this hosted Map Tour URL apps/MapTour/index.html?appid=
12348616c3984f91bc3fdc517e119999&webmap=1234fdc2c21847c7b5b13f68c5d9999) - Optionally remove samples folder
- Copy files to your web server root or in a specific folder
If you prefer to build your webmap without the interactive builder:
- Open ArcGIS Online web map viewer
- Create a web map that fits your need (basemap, eventual additional context layers like the path of your tour, etc.)
- Import your data in the webmap
- Center the web map to the initial extent you want for the tour
- Save and share the web map publicly
- Open index.html with a text file editor
- Locate the configuration section at the beginning of the file
- Edit the line webmap:"" to include your web map id between the quotes (the webmap id is the string emphasized in this hosted Map Tour URL apps/MapTour/index.html?appid=12348616c3984f91bc3fdc517e119999&webmap=
1234fdc2c21847c7b5b13f68c5d9999) - Optionally remove samples folder
- Copy files to your web server root or in a specific folder
If you are using Portal for ArcGIS, please follow the instructions at the end of app/maptour-config.js to configure the application. Optionally you can also configure the application to use the ArcGIS API for JavaScript included on your Portal by replacing in index.html the 4 urls containing //js.arcgis.com/3.14/ with the following //webadaptor.domain.com/arcgis/jsapi/jsapi/ where arcgis is the name of your Web Adaptor.
It is crucial for the application performance that your tour points have well-defined thumbnail images. Thumbnail images are used on the bottom carousel and on mobile device. If you choose to host the pictures yourself, you will have to manually create thumbnails of your pictures. Using the full resolution pictures for the thumbnail will result in poor performance. For that reason we strongly recommend that you use an online photo sharing services or a Feature Service in conjunction with the interactive builder that will do that for you. The recommended thumbnail size is 140x93px.
In addition to the workflow supported by the interactive builder, you can use any point Feature Service, Map Service, Shapefile or CSV as a Map Tour data source as long as your layer follow the expected requirements detailed below.
To use your layer, simply add it into your webmap through ArcGIS Online web map viewer. See below for requirements depending on your layer type and consult FAQ to learn more about which web map layer will be used as a Map Tour data source.
The interactive builder support loading a CSV and will give you detailed information if your CSV doesn't match the requirements. To create a Map Tour from a CSV we recommend that you create a blank webmap using ArcGIS Online, publish a Map Tour and use the interactive builder to import the CSV. You can still drag and drop a CSV into the webmap but this is not the recommanded way anymore.
A sample CSV can be downloaded from the interactive builder Advanced options page or here (use right click + "Save as" if the file doesn't download).
The application will try to find the expected attributes using a configurable list of possible field name. By default, the valid fields names are:
| Fields | Valid fields names (case insensitive) |
|---|---|
| Name (mandatory) | name, title, name-short, name-long |
| Description (mandatory) | caption, description, snippet, comment |
| Picture (optional for Feature service with attachments) | pic_url, pic, picture, url |
| Thumbnail (optional for Feature service with attachments) | thumb_url, thumb, thumbnail |
| Color (optional for viewer, mandatory for builder) | icon_color, color, style |
| Is video (optional) | is_video, video, isVideo |
If that doesn't match your data, you can change the possible fields name through the configuration file app/maptour-config.js.
The picture and Thumbnail fields are mandatory for Feature Service without attachments and optional but strongly recommended for Feature service with attachments (this save one request per feature to get the URL of the picture and thumbnail).
When using a Feature Service that store the pictures as attachments, only the features with two attachments will be used (first attachments defines the main picture, second defines the thumbnail).
The color field is mandatory for the interactive builder. This means that if you are looking to reuse a web map containing a Map Tour layer that doesn't include a color field, the interactive builder will ask you to choose which field has to be used for defining the color. You can select any field and it will default to the default color (red) if the record doesn't contains valid values. But if you choose to use a field used for another Map Tour information, you should not use the color selection as it would overwrite that information by the new color you define. If possible, it is more safe to add that extra field to your data.
Using the interactive builder, you can create a webmap to be reused in the downloadable. That webmap will use photos that are already online, such as images stored in a photo sharing site like Flickr or images stored on your own website. Images will be referenced in your web map via their URLs and a feature collection. This mean that pictures are not stored in ArcGIS Online. If hosted pictures can't be accessed, they won't be available in the Map Tour and you'll see a 'Picture not available' image. Depending on your photo service provider, the Map Tour may not import the name, description and location of the pictures. Those attributes are stored in the web map and any edits to the online services won't be reflected in the Map Tour.
Yes, web map designed for the previous version should continue to work without any modification. Customization and enhancement of the application will require code changes, most of them should be easy to translate into the new application.
Yes, Map Tour is included in Portal for ArcGIS 10.2.1. Note that for technical reason, the Feature Service creation isn't yet available from the interactive builder. If you want to use a Feature Service, please consult this section.
If you use an older version of Portal, you can download and deploy the template in the following folder ArcGIS\Portal\webapps\arcgis#home\webmap\templates\MapTour. This folder may already contain a non-functional version of the template. If this is the case, remove the folder's content before copying the new files. Then refer your Portal documentation for instructions on publishing a new web application item and adding it to the web application gallery. If you choose to deploy the template in any other folder, some configuration will be required (see index.html configuration). Also note that the web application gallery preview feature won't be functional and give a 404 error.
Please note that the most recent version of Map Tour may not be compatible with older version of Portal for ArcGIS. If you experience issues, please try to deploy older version of Map Tour like 2.2.3.
Yes, by using Portal for ArcGIS. When deployed on a Portal for ArcGIS instance, the Map Tour doesn't require any external service to function. But by default the template will still include the header social buttons and template publishers are able to import pictures from the some online pictures hosting services. These options can be disabled individually through the configuration file app/maptour-config.js.
The videos workflow has been simplified with version 2.2. If your Tour has been created with version 2.1 (before December 11, 2013), please see the dedicated section below.
When you are using the interactive builder to initialize your Tour from medias already hosted (all initialization options except ArcGIS Online), the data layer include an attribute that specify if the main media is an image or a video.
The builder automatically populates that field. If you are editing yourdata outside of the builder you have to take care of editing that attribute (use the string true or false).
If you choose to host your data in ArcGIS Online, the builder doesn't support adding video but this is possible.
If you are initializing the Tour from a CSV, make sure to edit the is_video field that is present in the CSV.
Another option instead of using a dedicated attribute to specify if the media is a picture or a video is to add a specific qualifier in the URL. When the is_video attribute isn't present or is set to false, all media are considered images except if the url contains isVideo (this can be achived using &isVideo, #isVideo or a folder).
The Map Tour template doesn't include a video player, so you have to use the external video player provided by your favorite video hosting service (find the option to embed the video and copy the URL present in the given code). If you want to host the video yourself, you can create an HTML page that contains a video player like Video.js.
####Using videos in Tour created with version 2.1
Map Tour created with version 2.1 continue to have the 2.1 behavior even when using the latest version of the interactive builder. In that case, the supported picture format are: .jpg, .jpeg, .png, .gif and .bmp. If your media doesn’t end with one of these extension, the Map Tour will consider the media to be a video, except when using a feature service (see below).
You can force a media that doesn't end with one of the supported extension to be treated as image using the URL qualifier #isImage that you have to add at the end of the URL.
The interactive builder doesn't provide a dialog to include video when using feature services with attachments, but it is possible to do so by editing your data outside of the interactive builder. In the arcgis.com map viewer, if you modify the picture fields to point to an external video and add a special parameter at the end of your URL (#isVideo), your media will be considered to be a video.
Note that you still need to have two valid pictures attachments or the point won’t be used. It isn't possible to use videos when using feature service attachments without the picture and thumbnail fields.
Yes, when the template is configured with an application ID, adding the URL parameter 'edit' will open the interactive builder. You will be prompted for user authentication. Note that some technical restrictions on browsers like Internet Explorer older than version 10 may apply.
Yes, that option is available with the download version.
You would have to edit app/maptour-config.js, change the MAX_ALLOWED_POINTS property to the desired value and add the new icons that will be used to number your points on the map.
Icons are located in the resources/markers/ folder. You only need to add new icons for the color you will use.
An extended marker set is available for download.
There is no technical limitation to the maximum number of points per tour but we recommend to keep your tour short and sweet. The number of points of the tour can impact significantly performance of the application on mobile device and older browser.
Yes, that option is available with the download version.
Icons are located in the resources/markers/ folder. You only need to add new icons for the color you will use.
An extended marker set is available for download.
Configuration happens in three files:
- index.html
- Web map id or web mapping application id
- Application layout
- Use the first data record as an introduction slide
- Header title/subtitle (webmap title/subtitle are used by default)
- Force a webmap layer to be used as the tour data source
- Optional zoom level to be applied for the story points following introduction
- app/maptour-config.js
- Embed mode (remove the header)
- Header, picture panel and carousel colors
- Header logo image, link and social button configuration
- Map popup colors
- Locate button
- Map markers icons sets
- Data fields election rules
- Data import from online service
- Portal and proxy URLs
- Bing map key
- Geometry and geocode services URLs
- Proxy rules
The application will use the web map upper visible point feature layer.
Eligible feature layer are:
- Feature service with two attachments per feature (main picture as the first attachment, thumbnail as the second)
- Feature layer without attachments
- Web map embedded data: CSV, Shapefile
- Map service: specific layer only (e.g. MyService/MapServer/0)
If that doesn't match your web map structure, look for the configuration property named sourceLayerTitle in index.html and set it to the title of your web map layer.
The Map Tour viewer is supported on IE8+. The interactive builder is supported on IE9+. We actively test it in all major browsers but if you experience some difficulties, we recommend that you use Chrome.
If you experience some difficulties, please let us know. In the meantime, by building your Map Tour using the CSV template you will minimize your interaction with the builder interface.
We recommend landscape orientation photos instead of portrait. Portrait orientation images can be used but on smaller screens like the iPad, a lot of the photo may be obscured by the caption, because text takes up more space when it is displayed in a tall area compared to a wide area. Although images of different sizes, shapes and orientation can be used in one Map Tour, we recommend using the exact same size and shape for all the images. In this way, the user won't be distracted by different sized images as they follow the tour.
The recommended picture size is 1000x750px. The recommended thumbnail size is 250x166px. [More info] (http://storymaps.arcgis.com/en/faq/#question30)
The header and picture title/caption can include HTML tags to define formatting and links.
For example, this code adds a yellow link:
<a href="http://storymaps.esri.com/" style="color:yellow" target="_blank">StoryMaps Website</a>
When your data are stored in a Feature Service, the authorized HTML tags may be restricted to those listed in the following document.
You can add additional supporting layers into the map. These layers will appear in your Map Tour to provide orientation, background, and any other geographic features you want the map to show in addition to the Map Tour points, such as a study area, a walking or driving route linking your tour points, etc. The template displays these additional supporting layers using the symbology you specify in the web map, the popup aren't available.
There's a limit of 99 points per tour. Most Map Tours will of course be significantly shorter than that. Don't expect your audience to want to step through too many tour points. You might find your subject fascinating, but don't assume they will too!
If you want to embed the template in another website through an iframe, adding the optional parameter "&embed" at the end of the URL will remove the header. That mode can also be set in the downloadable version through the configuration file.
Exemple of iframe code that remove the header:
   <iframe width="100%" height="500" frameborder="0" scrolling="no" marginheight="0" marginwidth="0" src="http://esrimedia.maps.arcgis.com/apps/MapTour/index.html?appid=24e56b98a2644beb862db5d55c8ea355&embed"></iframe>
   <br />
   <a href="http://esrimedia.maps.arcgis.com/apps/MapTour/index.html?appid=24e56b98a2644beb862db5d55c8ea355" target="_blank">View Larger Map</a>
It is possible to open the Map Tour on a specific point and not on the first one by using the URL parameter index (from index=1 to index={number of point}).
Most of the look and feel customization can be done using the user download and including the css/html override directly into index.html. If you want to change the behavior of one functionality or want to add new one, you will need to read the developer guide below.
The easiest way to find the id or path to the DOM element that you want to customize is to use your browser developer tool, read documentation for Chrome, Safari, Firefox.
Here are some customization that can achieved through a style tag (look for /* CUSTOM CSS RULES */ in index.html):
  ...
  <body class="claro">
     <style>
        /* CUSTOM CSS RULES */
		#element {
           /* changes */
        }
     </style>
  <div id="header">
  ...
  #headerDesktop {
     background: url('resources/my_background.jpg');
  }
To remove the bottom border:
  #header {
     background: none !important;
  }
The button can now be disabled through app/maptour-config.js file and many other property are available.
To hide the text, empty the HEADER_LINK_TEXT property.
To display multiple line text, empty the HEADER_LINK_URL and configure HEADER_LINK_TEXT with html markup like
<a href='http://myorganization.com' target='_blank'>My organization</a><br /><a href='http://myorganization.com/myproject' target='_blank'>My project</a>
The logo image can be configured through maptour-config.js file. To hide the logo, empty the HEADER_LOGO_URL property.
The logo dimension is constrained to 250x50px. To use more horizontal or vertical space you need to remove this restriction using:
  #headerDesktop .logo img {
     max-width: none;
     max-height: 90px;
  }
You can save 10 more px by changing the top margin of the logo:
  #headerDesktop .rightArea {
     padding-top: 15px;
  }

  #headerDesktop .logo img {
     max-width: none;
     max-height: 100px;
  }
This is useful if you use a custom basemap that don't cover the whole world.
  #mapPanel {
	background-color: #1F1F1F !important;
  }
This developer guide is intended to developer that wants to modify behavior or add new functionalities to the Map Tour application. If you only need to customize look and feel of the Map Tour, you should be able to do so using the User download. It requires basic knowledge of HTML, Javascript and CSS languages.
The template fire some events to allow customization with lose integration. This mean that you may not need to understand the internal of the application to extend it.
Three events are available (application ready, before/after picture change):
	require(["dojo/topic"], function(topic) {
		// The application is ready
		topic.subscribe("maptour-ready", function(){
			console.log("maptour-ready");
		});

		// Before loading the new point picture/video
		topic.subscribe("maptour-point-change-before", function(oldIndex, newIndex){
			console.log("maptour-point-change-before", oldIndex, newIndex);
		});

		// After the new point is displayed
		topic.subscribe("maptour-point-change-after", function(newIndex){
			console.log("maptour-point-change-after", newIndex, app.data.getCurrentGraphic());
		});
	});
Download and unzip the Developer download or clone the repo.
| File | Contains |
|---|---|
| MapTour/ | Map Tour source folder |
| MapTour/src/ | The application source code |
| MapTour/deploy/ | The ready to be deployed Map Tour application |
| samples/ | Sample data layer to create your webmap |
| Readme.md | This document |
| map-tour-storytelling-template-js.png | The application screenshot |
| license.txt | The application license |
To build a production version of the application from the source code, you first need to install Node.js.
Then initialize the environment by running the following commands in the MapTour folder:
npm installnpm install –g grunt-cli
This will create a new node-modules folder in your project root with all tools to build the project. If you have trouble running the second command, see this documentation on how to install grunt-cli locally.
- Make accessible the src folder to your web server
- If using a Portal for ArcGIS instance configure the sharing url
app/maptour-config.js(last properties) - If you are not using a modern browser you have to set-up a proxy on your development computer and configure the url in
app/maptour-config.js(you can use a relative path) - Use or use the URL parameters
webmapandappidto specify the item to be loaded (all parameters from index.html are ignored in development mode)
- Open a terminal and navigate to the MapTour folder
- Run the following command:
grunt
The deploy folder now contains the built application that you can deploy to your web server.
The build script perform code validation through JSHint, you can disable that by editing Gruntfile.js and look for the following comments /* Comment out to disable code linting */.
Map Tour relies on AMD and Dojo loader AMD for application structure.
The application is structured as this:
| Path | Contains |
|---|---|
| app/ | Package structured Javascript and CSS source code |
| app/maptour-config.js | Configuration file (loaded at execution time) |
| app/storymaps/builder/ | Builder modules common with other storymaps templates (main module is Builder.js) |
| app/storymaps/core/ | Core modules common with other storymaps templates (main module is Core.js) |
| app/storymaps/maptour/builder/ | UI components of the interactive builder (main module is BuilderView.js) |
| app/storymaps/maptour/core/ | Core modules (main module is MainView.js) |
| app/storymaps/maptour/ui/ | UI components of the viewer grouped by target device |
| app/storymaps/maptour/ui/Responsive.css | CSS Media queries rules |
| app/storymaps/maptour/BuildConfigBuilder.js | Require.js build configuration file for the interactive builder |
| app/storymaps/maptour/BuildConfigViewer.js | Require.js build configuration file for the viewer |
| app/storymaps/ui/ | UI components common with other storymaps templates |
| app/storymaps/utils/ | Utility modules common with other storymaps templates |
| lib/ | External dependencies |
| resources/nls/ | Externalized text strings of the application |
| resources/markers/ | The 4 colors set of map marker |
| resources/icons/ | Icons |
The main dependencies are:
We would love to hear from you!
Find a bug or want to request a new feature? Please let us know by submitting an issue.
Esri welcomes contributions from anyone and everyone. Please see our guidelines for contributing
Copyright 2013-2017 Esri
Licensed under the Apache License, Version 2.0 (the "License"); you may not use this file except in compliance with the License. You may obtain a copy of the License at
http://www.apache.org/licenses/LICENSE-2.0
Unless required by applicable law or agreed to in writing, software distributed under the License is distributed on an "AS IS" BASIS, WITHOUT WARRANTIES OR CONDITIONS OF ANY KIND, either express or implied. See the License for the specific language governing permissions and limitations under the License.
A copy of the license is available in the repository's license.txt file.